Thursday, September 26, 2013

More PROPS!

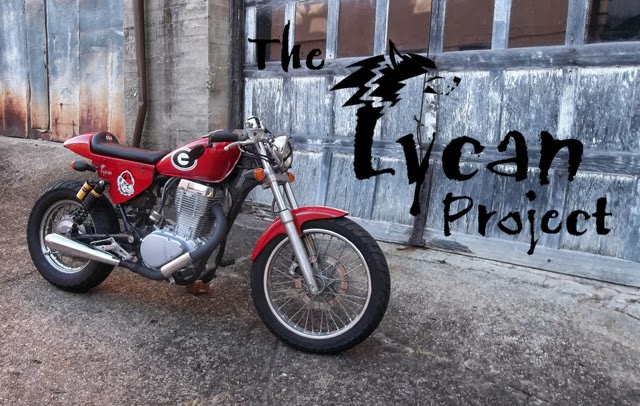
    On a recent trip to Riders Hill in Dahlonega, Georgia they asked if they could take a picture of the bike and post it on their facebook page.  They asked me a few questions about the build and I was more than happy to comply.  Below is the post and a photo from their page.

We had a visit yesterday from this very cool bike and it's owner, Daniel Short. It started life as an '86 Suzuki Savage he bought for $500. You can see the transformation in cool photos on his very interesting blogspot.


Photo: We had a visit yesterday from this very cool bike and it's owner, Daniel Short.  It started life as an '86 Suzuki Savage he bought for $500.  You can see the transformation in cool photos on his very interesting blogspot at http://www.thelycanproject.blogspot.com/

  I can get excited about the project and it doesn't mean a thing. When other people get excited about it, that's something all together different. Riding across town and a guy pulls up beside you with a big grin and gives you the thumbs up! Going into a store and coming out to find a small crowd around the bike. All those things are really cool and make you feel really good.  The way this bike puts a smile on peoples faces is really fun. 
         Most of us are really proud of our bikes.  We have a connection with them.
Whether we built them or just set them up to our personal taste, they are a reflection of who we are, at least of how we see ourselves.   A positive reaction from our peers is a validation, on some level, of us as individuals.  I know at some point there will be someone else that has a newer or cooler bike, I only hope I will be as congenial to them as others have been to me.  In the mean time I am still enjoying the attention.


Wednesday, September 25, 2013

Upgrades and improvements!

     I have had some concern about the front brakes and their effectiveness.   The other bikes I have owned were all far superior to this bike in overall brake performance.  I have to this point changed the fluid and the brake pads and there has been little improvement.  I noticed a little leak from the master cylinder when I changed the brake fluid and the brake light actuator is only marginally functional so it seems like a good idea to upgrade it.  I found a 2005 master cylinder on ebay for $38.95 shipped, cheap enough.   The brake light actuator is improved on the later models so I will have to modify the wiring a little.  The first step was to drain the fluid reservoir and remove the old master cylinder.  The old brake switch was not very well protected from the elements.


     I went ahead and bolted the replacement master cylinder into place and reattached the brake line to close the system up.

 
     Yea, I know the throttle cable and housing are on the upgrade list as well as the clutch cable and housing.  The old wires for the brake switch were not very long and they were soldered to a fiber plate where connections were made. 
 
 
The wires were snipped at the connection plate and extensions were soldered onto the old wires and wrapped with shrink wrap to seal out the weather.
 
 
I made sure to slide the heat shrink into the old housing as far as possible.
 
 
Instead of being hard wired the new switch has two male connectors.  I first slid a large heat shrink cover onto the wires, then I installed two female connectors with right angle bends onto the wires. 
 
 
Next I used a heat shrink wrap large enough to slide over the connectors and slid them into the larger wrap.  With all this in place I heated the covers with a heat gun to seal everything up.  From there it was just plug up and adjust.
 

The process of filling and bleeding the replacement master cylinder was pretty straight forward.  That will be the topic for a later post all on it's own.  The brakes seem to be much improved on a short test ride.


Monday, September 16, 2013

A Professional Paint Job

 
Wow!  I live my life by the premise that all things work out for the best in the long run.  This is just another example of this theory in action.  Having these parts painted by a professional body shop was the way to go.  The local shop gave me a great deal and he did a great job.  I had the local sign shop cut some vinyl stripes and that along with the extras from before made the vinyl application a breeze.  Measure twice place once!  


Assembled and waiting on the seat.  The dropped front end and the reverse cone shorty exhaust.  I love the way this exhaust sounds. 

 
The seat installed and ready to redo the glamour shots!


The final touch, the UGA Arches on the saddle.

 
     Rode the bike a little over the weekend and changed the jetting again.  I switched back to original set up, a 155 main and 47.5 pilot.  I have been playing with the air screw but I still am not satisfied.  That is the great thing about this bike so far, I can work on the bike and work through the problems.  It's fun and I learn a ton in the process.   When I get it worked out I might even give myself another bone.
 
      People always ask about the bones.  At UGA the white bones are for exceptional plays, and the black bones are for academic achievement.  On this bike the white bones are for exceptional rides.  Dangerous rides like the test rides when I was building the bike. The local big rides like Wolf Pen GAP or Blood Mountain, and one of these days the Dragon.  I also put a few on for recognition from others, mentions on Podcast like The Pace, unsolicited pictures or mentions in other forums.  The posting on UGA's Athletic facebook page and the 3.46K likes.  The black ones are for technical achievement on my part during the build; the rear sets and connecting rods, the seat cowl, the engine electrical work, and the suspension.  I may have to give myself one for design because it has turned out better than I ever imagined and of course "It is just so damn much fun to ride!" 
 
 
Give that DAWG a Bone!


Wednesday, September 11, 2013

Fork Modifications.

While the bike is apart for painting I decided to replace the fork seals.   Since the forks will be apart it also makes sense to lower the front forks at this time.  RYCA makes spacers that can be inserted onto the fork cylinders above the springs which result in taking the fork tubes and pushing them 2 inches further into the fork lowers.  This results in decreasing the effective rake and trail of the bike.  It decreases front travel from 5.5 inches to 3.5 inches.  By not trimming the spacers or changing the springs the fork is much firmer due to the preloaded compression on the spring.  The diagram below shows the lowered fork tube in pink and the location of the lowering spacer in neon green.


Two very important tools for this procedure can be made from parts purchased from your local hardware store.  The fork tool, on the left, can be made by purchasing 1 24" section of 3/8 threaded rod and 4 hex head nuts.  The nuts are threaded onto each end and locked into place by tightening the nuts against each other.  The other piece is a 24" long section of 1.5 inch pvc.  This is used to seat the oil seals when reassembling the forks.


The fork should be locked into some form of soft jawed clamping device.  I used an inexpensive work aid that I replaced the jaws with 2X4's some years ago.  this is necessary because the bolt on the bottom holding the cylinder in place is very very tight.  Insert the threaded rod into the fork until the hex nut locks in the top of the cylinder.  Insert a 8mm extended reach hex key into the bolt on the bottom of the fork.  I used a cheater bar (3/8 square steel tube 18" long) on the hex key to enable me to loosen the bolt.

 
Be sure not to lose the brass crush washer on the bottom bolt.  Once this is done you can remove the cylinder and spring by inverting the fork.  It's messy so have a rag handy.  Take a small flat head screw driver and pry up the dust cover and slide it off the fork tube.  Then take a small flat head screw driver and remove the seal retaining clip above the fork seal.  At this point you can remove the tube from the lower by compressing and then pulling apart the top and bottom halves of the forks.   This may take several tries to separate the two halves.  Once apart the upper portion has the seal, a washer, and a metal slide in that order.  Remove the seal only taking note of the orientation of the seal on the tube.   Slide the new seal on the tube in the same manner as the one you just removed.   


Take the cylinder and remove the spring, slide the lowering spacer on and then the spring as pictured below.  

 
Reinsert the top tube into the fork lower and insert the cylinder with the spacer and spring.  Insert the removal tool and the bolt on the bottom with the spacer and tighten securely.


Slide the fork seal into place in the fork lower, using the 1.5 in. PVC tap the seal into place until the groove is visible for the retaining spring.


Replace the spring and make sure it is seated securely into the groove. 
 Then replace the dust cover.

 
Repeat for the other fork and you are ready to reassemble the forks on the bike.   Once the forks are back in the triple trees, insert the springs and then the washers in each tube.  Now compress each fork, the washers should be just below the top of the fork.  either use ATF Dexron or 15W fork oil.  Use 15 oz. of either oil.   15 oz. should fill the compressed fork to the top.  Then extend the forks and insert the spacers.  The spacers should extend 2 inches above the top of the tube.   This is the hard part!  Really!  Replace the top caps and while compressing the spacer into the fork turn the top cap until it begins to catch the threads and then tighten.  This is pretty difficult and may require two people and quite an extensive vocabulary of vulgar language to accomplish correctly.  If  you do not have a helper it may also require two or three trips to the hardware store and the purchase of a 27 mm socket to complete the job.  Just my experience yours may go better.
 
Before.   

 
After!


When I measured the trail with laser levels before it was 5 inches. 

 
After installing the spacers, using the same procedure as before it measures 4 inches now.   That is actually a really good number.

 
      I found the data somewhere that the RYCA CS-1 has a trail of 4.75 inches and a rake of 29 degrees.  The stock LS650 is 5.65 inches of trail and 35 degrees of rake.  Based on what I have read the way I measured the trail is about as accurate as I can get.  I'm going with 4 inches.   With the rejetted carb and the lowered front I'm really looking forward to riding the bike when I get the parts back from painting.  
 
     My only concern at this point is the tank and how far out of level it will be.  The petcock is in the rear and this may be a problem or maybe not. 
 

Wednesday, September 4, 2013

Some People Just Never Learn!

     Apparently I am one of these people.  Just because you read it on the Internet, or saw it on YouTube doesn't mean its correct!  I researched it to a point that I was satisfied with the results.  I checked with a couple of people I trusted.  Then I jumped in whole hog and painted the bike red.  I then went ahead and added a couple of coats of what was listed on the can as Automotive Clear coat!  Polished it, and it looked great.  So great I fell in love with the bike all over again.  See previous post.  Then I had to fill the tank, and I had to try and get that little bit extra in there.  I over filled it and spilled gas all over the tank. 

     I knew I was in trouble when I reached for a paper towel at the station to wipe up the spill and pieces of the towel stuck to the tank.  Big pieces stuck to the tank.  The clear coat was dissolving right before my eyes.  Oh SHIT!  After I was knee deep in the painting process I had found one post on an obscure website that mentioned this type of problem.  It had to be the one piece of truth on the Internet.  I was screwed.    I had sent a link to the athletic department at UGA last week.  They went so far as to post a picture of the bike on their facebook page.  3.4K likes later I feel obligated to fix it.  So back to the drawing board.

https://www.facebook.com/photo.php?fbid=575604045808213&set=a.177967868905168.30613.161215620580393&type=1&relevant_count=1

     I went to several local paint shops and got estimates from $200 to $400 to paint the bike, one color no stripe.  This was the price after I had taken it to another local shop and had it sand blasted, which cost $60 for the tank and fender.  Of course there were several places that had been bondoed on the tank.  I spent another $40 on stripper and removed the paint from the seat cowl myself.  Oh by the way the warnings about avoiding contact with your bare skin are there for a reason!  I had on rubber gloves and a short sleeve t-shirt and a small amount of the paint and remover mixture got on my forearm, second degree burn.  Cover all skin, really.  It wasn't big but it hurt like hell.    Product worked great but it removes skin just as effectively as paint.

Product is very effective.  It has a very similar effect on skin. 


After a wash with water and steel wool all paint is gone.
 
 
I decided to take the opportunity to tackle a few nagging problems on the bike while I wait on the painting.  The fork seals need to be replaced and one of the bolts that hold the fender in place had been sheered off before I got the bike. I have the fork seals and I might as well tackle it now.  I am going to order the lowering kit as well from RYCA and drop the front end 2 inches.


Front wheel and forks removed.  There are plenty of resources to show this procedure.

 
Forks partially disassembled, waiting on parts.


Drill out proper size hole in broken bolt. 

 
Hole needs to be in the center.

 
Insert easy out by turning counter clockwise.

 
Be very careful and do not force easy-out will break.

 
Once out replace with a new bolt.

 
I also decided to try rejetting the carb once again.  The bike has never gotten proper MPG and was still running a little ragged.
 
 
150 main jet.  52.5 Pilot jet. 


Hopefully next time we will be able to finish the forks and reinstall the newly painted body panels and tank.