Monday, July 29, 2013

Half Assed Doesn't Cut It!

      After riding the bike pretty hard for a couple of days I made a discovery.  In my haste to get the bike on the road I had sort of "Half-Assed" the belt guard.  The result was some extensive damage to the heel guard on my left riding boot.  I  need to fabricate something a little more substantial than my original guard.  A trip to Lowes produced a piece of 16 gauge steel plate, and the design process began. 

Belt Rub!  Damn!


Half-Assed belt guard.

 
Pattern the item first and mark the fold lines.


Layout on stock.

 
Cut out with a cut off wheel.


Clean up the rough edges with the grinder.

 
Bend along fold lines.

 
Fitting.


A little paint.

 
The new and improved belt guard.

 
As you may have noticed I allowed the guard to extend down and attach to the inside of the rear set.  I did this to add to the rigidity of the guard.  Considering the amount of damage I did to my boot I thought it would be wise to make it as strong as possible.  I was pushing pretty hard on the belt with my heel.

 
I also took this time to install the stock helmet lock from the original bike.  The switch, filler cap, and helmet lock all use the same key.  This is one of those little additions that just make the bike a little nicer.  The lock on the Savage is in my opinion one of the better thought out locks I have seen.  It is simple, unobtrusive, and does the job.

Hiawassee, Helen', Back.

     Riding the bike a little I have discovered a few bugs.  The first and most crucial was a recurring problem with the petcock.  The bike would simply cut off from fuel starvation after about ten minutes of riding.  Switching to reserve did not help but switching the bike to prime solves the problem.  Riding a bike you are not familiar with without a trip meter and no reserve is a problem.  The forums offered several solutions as well as trouble shooting ideas.  I found a 2009 petcock on ebay for $29 and ordered it.  This was a really simple repair and took less than 5 minutes to install the petcock.  Removing and draining the tank and several other parts obviously took longer but the whole process took about an hour. 

     I also got caught in the rain one afternoon.  Fenders at least a front fender was a must.  Fortunately the bike came with a good front fender so a little paint, some bolts solved that problem.  I would like to have some type of rear close fitting fender but we will see about that later as well.


      I like to ride with a tank bag.  It just helps to have a rain suit, garage door opener, multi tool, and a few other items. Not to mention picking up small items on the way home, like a sandwich or jewelry for you wife when you are late.  On the current setup this is a problem as the speedo is on the tank.  Some sport bike riders use a bicycle computer on their bikes.  This allows them to  record exact speeds as well as average speed, trip distance, maximum speed and so on.  I had a couple of the wireless versions in my shop but could not get them to work.  It may have been some form of signal interference created by the specials electrical system.  I ordered a wired version on ebay for $12.  It not only measured all the speed and distance functions but it also had a clock and a temperature gauge, two really necessary features.  Married guys need to be back in two hours when they tell their wife they are going to be back in two hours.  Really, really important, much cheaper than jewelry!  There were a few installation issues but it works pretty well.

The next issue is the seat.  Short trips 20 minutes or less the current setup is fine.  50 or sixty miles not so good.  The minimalist seat is great for hanging off in the twisties but just sitting is a problem.  I installed a set of old stunt pegs from a bicycle I had on the mounts left over from the forward controls.  I started to cut them off but leaving them was a good call.  Changing foot positions helps not only my worn out knees but my sore butt.  I am going to wait on the seat. 

Time for a little longer road trip.  Maybe about 90 miles to Hiawassee, Helen', and Back.  Up 197 and 76 then back over Unicoi through Helen.  I worked my ass off on the curves.  Sliding about half my ass off to the inside and pressing my outside knee and elbow into the tank and pointing my inner knee it really seemed to work pretty well.  I tried to also shift my head and torso inside the axis of the bike.  It was a lot of fun but I was tired and a little sore when I got up the next morning. 
 
Falls at Mark of the Potter, Hwy. 197.
 
 
Town Square in Hiawassee, GA.


On the lighter side coming back over Unicoi I ran up on a camper behind a truck on the downhill and all the sudden the bike shut off. I thought I can’t be out of gas and switched the petcock to reserve nothing. Looked over and I had hit the kill switch sliding around on the bike. Flipped it back on and it restarted. Then a guy at Betty’s Country Store in Helen, Ga. asked me if it was a Triumph. I must have done something right because that is kinda what I was going for!
A few days later I got the chance to take Thursday afternoon off and another chance to hit the road. I headed over to Rider's Hill in Dahlonega, GA. about 30 miles from home. Rider's Hill is located on the southwest corner of what is arguably some of the best motorcycle roads in the country. The legendary 6-GAPS. Rider's Hill http://ridershill.com/ is a must stop if you are ever in the area on a motorcycle. Food, gear, maps, repairs, tires, and usually lots of like minded motorcyclist sitting in the white rocking chairs that face the parking lot and all the bikes. This Thursday was not a hopping day though so I decided to tackle 3-GAP on the Special. Woody's, Wolfpen, and Neel's GAPS comprise the route for 3-GAP.

Woody's GAP North Georgia.


Just over the top of Woody GAP and the Appalachian Trail is Suches, GA and       Two Wheels of Suches.


Another meeting place for motorcyclist in the North Georgia Mountains.   It was closed until the weekend so Wolfpen was next.  Right before I reached the top of Wolfpen the rain hit so I got a chance to try out the rain mods on the Special.  Rain Jacket out of the tank bag and I was good to go.  Fenders are truly a great an often over looked invention.  Really a good move to install the fender on the front wheel.  Lightening is not something I trifle with so when I got to Neel's GAP I stopped at Mountain Crossings to get out of the weather.   Wet hikers heading in off the trail, no desire to tackle the AT for months on end.

Blood Mountain Neel's GAP in the rain. 

 
After it slacked up a little I headed home in the rain.  The sun was shinning and the rain was coming down, if I could have just stopped to get a few pictures.  There was one spot I could see about two or three curves ahead through a rainbow in the falling rain.  It was spectacular!  I'm really liking riding this little bike.


Monday, July 22, 2013

The Lycan Special

         The iphone is truly a life changing invention.  When I am riding a motorcycle I use it to for entertainment, weather reports, GPS functions, an accurate speedometer, and my radar detector runs through it.  Pair it with a blue-tooth helmet communication system and you have the option to communicate as well hearing all the turns, warnings, and music in your head.  Really all I need now is a heads up display showing me speed, rpm, and fuel remaining in my helmet and I'll be good to go.  I told a friend I ride with once that if I ever crash it will be because I am fooling with the electronics.  Multi-tasking on a motorcycle can be problematic. 
      On the Lycan I do not have a place for it to mount and don't plan to install one either.  If I need to take a call, check the weather, or get directions I pull over and stop first.  When I am riding the Lycan all I use it for is music or podcast.  I listen to a lot of pod cast about motorcycles. I will listen to just about anything that has to do with motorcycles. I listen to them while I am riding or when I am working in the shop.  My favorites are The Pace Motorcycle Podcast, Cafe Racer Podcast, and Cleveland Moto Vintage Motorcycle Podcast.  I have listened to many of these multiple times.  
    One recently from Cleveland Moto included a Cafe Racer history lesson.  The original term was a derogatory term.  "Their not real racers, their Cafe Racers!"  When the retro bike movement started in the US and Japan they needed a name for the style of bike and Cafe Racers stuck.  Modern riders that fit this mold are the sport bike or crotch rocket riders that trick their bikes out for racing but never see a track day.  The original riders called their bikes "Specials".   So in their honor the Lycan is hence forth the "Lycan Special". 
       A Special needs some cool graphics, right?  I have already embroidered the wolf head logo on the seat so keeping with the same theme I went with a high contrast metallic silver and red accents.  I had already put the graphics together in vector format, so I called the local sign shop and asked if they could cut them out for me.   That afternoon and $30 later I had decals.  The process is pretty simple. Just peal and stick.  I got an extra set in case I screwed it up.   To really make it last a coat of clear coat over the paint and the graphics is the long term plan.   The extra set will come in handy. 
 
The Tank Graphics.


Side Panels.
 
 
Seat.
 
 
Medallion on the seat Cowl.


The Lycan Special


Monday, July 15, 2013

Every Once in Awhile, She Does Too!


I just love this photo.  It has kind of an Eastern Block, Industrial, Mad Max kind of feel.
 
 
Below you will find a link to a Walk Around Video on the The Lycan.   I am pretty happy with the sound on this bike.  I have never been much of a fan of loud pipes but this Thumper with the reverse cone muffler sounds pretty good.   It seems much throatier when you are riding.  On close in streets and alleys the echo is intoxicating.
 
 
       Speaking of the sound I am going to share a little bit of wisdom I have acquired over the years.  I see riders on their bikes with overly loud pipes that rev their engines as they pass groups of people.  I know they are thinking "Hey, look at me I'm cool!   Those people are looking at me and thinking I'm cool.  They wish they were on one of these!"  I've done it and though I hate to admit it that's what goes through your mind on some subconscious level, but hey that's OK.  If you don't admit it your ling to yourself and everybody else.  I don't care if you are on a bicycle in spandex and everyone is looking at you as you ride by, you are thinking that.  If you weren't you wouldn't be able to do it, you'd be to embarrassed.  Here is the wisdom part.  If you are loud, dressed differently, or just conspicuous, and people are looking at you, what they are actually thinking is, "Look at that ASSHOLE, he thinks he's cool."    That's what we like to call "Ahurtsdon'tit?".   (A hurts don't it?) 
        Truth be told most people think you are crazy or just plain stupid.  If you are a cowboy on your Harley iron horse with your chaps and your vest.  If your a knight errant on your BMW fully fared charger with your armoured riding suit and flip face helmet.  Embrace it, be different if that's who you are, but know that they are not jealous of the motorcycle, the bicycle, or even the clothes you are wearing.    They don't think you are cool or wish they were you.  If they are honest with themselves they are just a little jealous of your courage though.   The courage it takes to be different and wear it like a badge of honor.  
        So if I ride by you and roll back on the throttle a time or two, or flip up my visor and nod at your girl friend or wife, go ahead and think it.   "Look at that ASSHOLE, he thinks he's cool."   Because I probably am, I probably do, and every once in awhile she does too! 

Hell, even my wife thinks I'm cool.   Every once in awhile.


Thursday, July 11, 2013

The Journey.

Well we have reached the end of the first part of our journey.  A point where I plan to rest for awhile on this journey and enjoy some of the fruits of my labor.  I thought it might be good to look back at where we started and what it took to get here. 
 
We started out with a $500 bike I found on Craigslist.  It would crank and run with a life line from a Chevy truck, but that was all I knew for sure.
 
Day 1, April 1, 2013
 
 
I had an idea of where I was headed.
 
Finding the space to work.
 
 
A laugh or two along the way.
 

The take down.
 
 
And Down!
 
 
Off to a bad start.
 
 
Working through some issues.
 
 
Scratching my head more than once.
 
 
Getting really excited about something really simple.


Some interesting uses of my resources.  Places I could work with and places I couldn't quite seem to get things done.    Then coming up with a result that was spot on!


Some exciting break throughs.

 
Test Rides. Lycan Ver. 1.0
 
 
Day dreaming and sourcing parts!
 

Planning.


 And more test rides. Ver. 1.1
 
 
Something fun.  Lycan Ver. 1.2
 
 
Something I feel pretty good about.  Lycan Ver. 2.0


Wow!  Better that the original idea!


         Looking at these pictures I realize it has only been three and a half months.  It seems much longer and much more involved.  I have accomplished what I set out to do in phase one.  Build a bike!  I used old stuff and I found a way to make it work.  More than a few items came from Lowes, WalMart, and Ace Hardware.    Several came from ebay.  I didn't just buy parts I had them fabricated or I made them myself.  How cool is that.   I pulled across the scales at the local land fill the other day and asked the operator what we weighted.  After subtracting me and the gear I had on,the bike is at about 325 lbs.  I have never been much of a fan of loud motorcycles but the bike sounds incredible.  The joke with one of my friends is that the bike is the "Sheep in Wolf's Clothing!"  Yes you read that right.  "Sheep in Wolf's Clothing!"
      
     I plan to ride the bike a little and get a true feel for it.  Maybe meet some like minded people that I have heard about in the area.  I also promised to stop by the local shops I used to let them see the finished project.  If you are reading this and you were one of the folks that helped me along the way.  Thanks Again! 
 
     Oh, by the way, I'm not done here by any means.  This is where the fun really starts.  Between working on the bike and riding the bike.  I hope to have more than a few stories to tell.


Wednesday, July 10, 2013

Cosmetology 101

The custom fiberglass seat cowl is a pretty long and drawn out process.  I wanted to make it myself and to have a custom fit and appearance on this bike.  In retrospect it might have been cheaper and most decidedly easier to purchase a premade unit from a supplier.  One option is www.hotwingglass.com .  I spoke with him at The British in The Blue Ridge Rally after I was pretty well invested in doing it myself.   $100 seems like a lot of money but when you add up the supplies, the time, and the mess, not to mention the quality of the end product , BUY ONE!
 
I started out with a trip to Walmart.  Yes Walmart.  I purchased Dry Foam in the home decorating department.  This is used by florist when they arrange flowers.   Painters tape, fiberglass cloth woven and non woven, fiberglass resin and hardener, paint brushes, and 3M spray adhesive.  I had to buy resin and hardener three times at $17 a pop.  I could have gotten a gallon but I didn't know how much I would need.  I spent about $90 by the time I was finished.  The process is as follows.
 
 
Foam and adhesive from Walmart.
 
 
Glue the blocks together in the general shape you want. 
Allow to dry for about 3 hours.

 
Using a marker layout the basic design you want.

 
Trim away the excess material.


Sand the end product down to get the finished form.
Then check fit on the bike.

 
Fine tune your design.


I cut out a recess for my brake lamp and that allowed me to mount it
directly to the cowl.


When you are satisfied cover the form with painters tape.


Use a good quality Carnuba car wax on the tape as a release agent for the resin.
 
 
First brush on a light coat of resin then begin to apply the fibered fabric followed by more resin.  When mixing the resin with the hardener mix a small amount at a time.  It hardens very quickly. 

 
I allowed an excess amount of fabric beyond the form.  This can be trimmed away easily after it has hardened.


One reason I wanted to make my own was to have a closed bottom area over the rear wheel.  The prefab units are just top shells.


Once the resin was hard I was able to remove the foam form I had made.  The closed bottom made it necessary to pretty much destroy the form to get it out.  After a little trimming and some sanding I was able to place the cowl on the bike and check fit. 
 
 
The fiberglass fit the bike like a glove.  The fitment was actually pretty gratifying but the finish was rough.


A lot of sanding and three additional procedures of laying fiberglass and resin then sanding and repeating gave me an acceptable if not perfect seat cowl.


I moved the turn signals to clear the cowl.  I also placed some 1/2 inch rubber weather striping on to the frame rails under the seat.  This helps to dissipate the vibration from the engine.   I also drilled holes for the brake light in the recess of the cowl as well as fabricating a mounting bracket for the light.   Oh yeah, new rubber mounted up and ready to ride!


Black gloss rattle can paint on the cowl, bracket, and the aluminium side panels.  

 
I had cut a piece of 1/4 inch plywood out to match the seat area of the cowl.  I had also picked up some black upholstery fabric at my local auto upholstry shop.  I used some 1/2 inch closed cell foam I had around the shop and stapled the fabric on with a neumatic stapler.  Note embroidered logo.  I used four bolts to attach the pad to the cowl from the under side.

 
With the cowl on the bike I was able to slide the aluminium side panels under the 1 inch side extention in the seat area of the cowl.  I then drilled through both panels and screwed both peices securly into place on the seat frame. 

 
Not perfect but not bad for my first try.

 
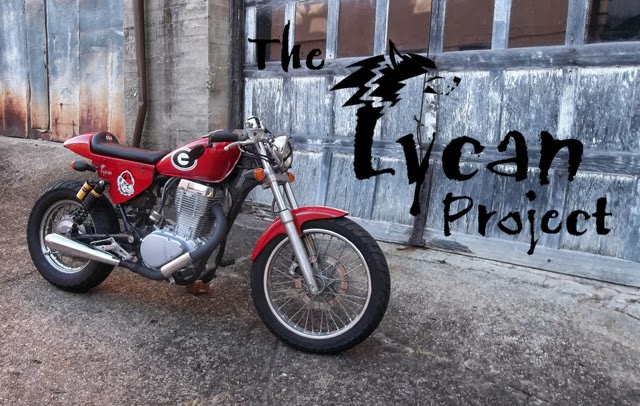
I've got a Cafe Racer!